Summary
A variety of Physician's Orders (medications, therapy, work restrictions, diagnostic tests, etc.) can be created from the ORDERS tab, and the text generated goes into the Plan section of the SOAP note. This tab is only available to providers.
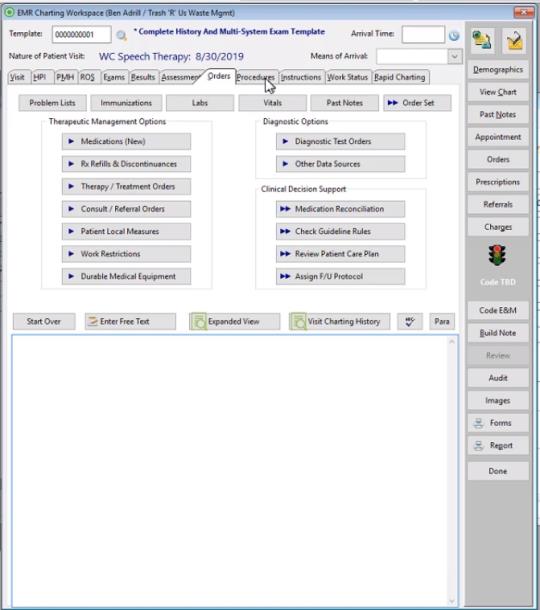
Each order record created has a specific type, indicated by the various buttons, and a status of Pending. Once created, orders can be reviewed in several ways:
-
Click the Orders button on the right of the [Generate Patient EMR Charting Note] window to display the [Orders from This Visit] window. On this window, orders can be added, changed, and deleted by the provider. This is not recommended since actions taken here will not be reflected in the charting note. Exit Care which prints patient instructions can also be accessed from here.

-
Click the Prescriptions button on the same window to view just prescriptions for this visit. From here, you can print scripts.
-
On the Whiteboard, double-click the patient, then click the Orders button.
-
Click the Orders button on the [Enter Visit] window to see orders for this visit. This is where users such as front desk staff would look at a patient's visit to see if there are actions to be taken when checking this patient out.
-
Work with orders in the Visit Orders Management system, which displays a list of orders filtered according to the user's specifications. From here, clinicians can entered results, attach images and reports, and mark orders as ready for review by the physician. Providers can review orders for which results have been entered, and mark them complete. While authorization information can be entered here, there is also a separate Authorization Management feature accessible by case management staff which is designed specifically for this purpose.
- As orders are entered, The software automatically enters appropriate documentation into the charting note. If needed, you can make changes directly to the note using the editing features.
- For Laboratory and Radiology orders, after a diagnosis or diagnoses is/are selected in the Select Associated Diagnosis window, those diagnoses are written to the charting note on the Orders tab of the EMR Charting Workspace in the following format:
"Diagnoses: ", followed by the Diagnosis Code - Description; Diagnosis Code - Description. - Diagnostic Tests and Other Information Sources can both figure into the calculation of the correct level of E/M code for the visit. After entering an order of either type, Net Health Employee Health and Occupational Medicine might have updated three fields seen on the ASSESSMENT tab: Number of Date Sources, Management Options Risk Level, and Number of Diag Procs Risk Level based on information entered when you set up the template and set up wizards for Diagnostic Tests and Other Data Sources. The provider can override these factors, based upon his/her expert knowledge to make the level of MDM complexity more exact.
- If the visit has multiple diagnostic codes associated with it, a Therapy & Diagnostic Tests orders can be associated with a single ICD-9 code. This might be done, for instance, when a patient fell resulting in a sprained knee and a laceration. An x-ray ordered would be associated only with the sprained knee.
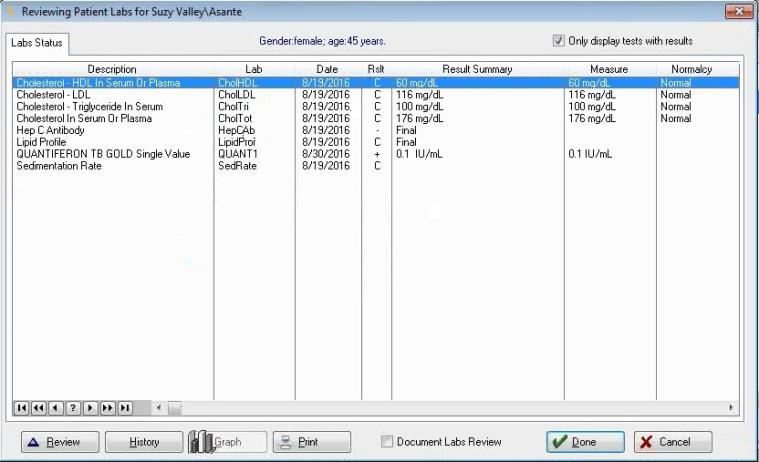
Labs
-
Lab = the lab test (medical activity)
-
Date = date of latest test administration
-
Rslt = the result code entered for the medical activity
-
Result Summary = a brief note entered into the record when results were entered
-
Measure 1 and Measure 2 = the actual lab value(s) for this test.
-
Next Due = the next date the lab test is scheduled to be repeated.
- Only display tests with results = When this box is checked the window will display only those tests that have results.
System Parameters
There are a number of EMR System Parameters that affect operations on this tab:
-
Automatically sign or print prescriptions when entered.
-
Size, format, and elements to be included when scripts are printed.
-
Allowing Wizards to automatically add charges to the visit.
-
Display Alert and Red Flag messages.
-
Sensitivity of drug interactions checks, and when the checks are run.
What Do You Want To Do?
Create Orders
-
Order Medications (prescribe, dispense, administer, or OTC)
-
To order medications for this patient, click Medications.
-
On the [EMR Charting Template Text Elements] window, there is a list of medications typically prescribed for this complaint. There are four ways to proceed. Each path will take you to the [Medication Orders] window.
-
Check all text elements that apply, then click Done. Text elements on this tab can either order a single medication or display a list from which you can select the specific medication. In either case, the [Medication Orders] window will be displayed for each medication being ordered.

-
Click Any Med to display the[Select Medication] window. Search for and select a medication from the full list of all medications in the system. By default, this window is sorted by the Medication Name column which contains the brand name. Typing characters in the Search box and pressing tab does an alphabetical search by that column. If you want to look a med up by its generic name, click the words "Generic Medication"
 at the top of that column to sort the table by the generic name (a plus sign, "+", will indicate that is the sort column now.) Now, the Search box will look by generic instead of brand name.
If the med is not in your Net Health Employee Health and Occupational Medicine medications table, it can be added from the Multum database "on the fly". Doing so first creates a permanent record for the med to your Net Health Employee Health and Occupational Medicine Medications Table. Then, you can select it for this visit.

-
Click Any Wizard to display a list of all Medication Wizards. Select a Wizard and you will be presented with a short list of just medications. Select the medication you want from that list.
-
Click Med Class to display a list of Medication Classes in the system. Select a class, and you will be presented with a short list of just medications in that class. Select the medication you want from that list.
-
NOTE: When creating a medication order for an electronic prescription, the system will not allow users to select and save the order if the medication is no longer available. The following warning will display:
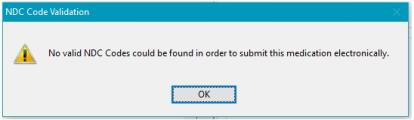
Confirm or change the details of each medication on the [Medication Orders] window. In particular, make sure the Dispense Type is correct, since this determines whether Net Health Employee Health and Occupational Medicine will create a prescription or a medication order. Read the topic on Prescribing Medications to learn about the use of this window. The default details on this window are entered when you set up medications.
-
-
If Dispense Type is Prescription, a prescription record will be created, for which you can print a script. Otherwise, an order record will be created, which can be seen as described above.
-
To look up drug information in the Cerner Multum database, Click View Drug Info. The information available on the [Multum Drug Information] window includes products available, recommended doses, side effects, and warnings. Order patient education leaflets by checking Create Patient Education Leaflet Order. (Note: Leaflets can also be printed from the INSTRUCTIONS tab for meds on the Current Medications list that were entered on the PMH tab, as long as they were selected from the Multum list.)
-
A Drug Dosage Calculator by clicking the Dose Calc button
 . It allow you to enter the patient's weight in pounds, ounces, or killograms along with a Dose Factor (e.g. 5mg per kg) to calculate the dosage for this patient in mg.

If the Medication you want to order is not in your database, it can be added "on-the-fly". Read the topic on setting up medications to learn how.
-
-
RX Refills and Discontinuances
This button displays the [Review Patient Medications] window, from which you can create a refill prescription or discontinue a medication. Read the topic on Prescriptions to learn more.
-
Medication Reconciliation
This button displays allow you to reconcile the medications entered in Net Health Employee Health and Occupational Medicine for this patient with prescriptions submitted by Surescripts, even those from other clinics/providers. Read the topic on Prescriptions to learn more.
-
Work Restrictions
-
Click Work Restrictions.
-
On the [EMR Charting Template Text Elements] window, check all items that apply.
-
Optionally, enter a Stop Date for the work restrictions. If entered, this date will be inserted into each work restriction selected, and the restrictions selected will be inactive after that date. If this is left blank, restrictions will remain active indefinitely.
-
Click Done.
-
Net Health Employee Health and Occupational Medicine will insert text and execute any Wizards associated with selected Text Elements. Make entries as required.
-
Work restrictions can be seen on the [Active Work Restrictions] list on the WORK STATUS tab for this visit, and on the PROBLEMS LIST tab of the Patient Chart. Entering a work restriction does not create an order record.
If a work restriction is not appearing on the [Active Work Restrictions] list, it is because of an omission in setup. For this to happen, the E&M CODING tab of the Wizard's setup, the checkbox labeled Add this Item to the Work Restrictions List must be checked. It is NOT checked by default when a new Wizard is create, making it an easy thing to miss.
-
If needed, you can make changes directly to the note using the editing features.
-
-
Diagnostic Tests and Other Data Sources
-
Click the appropriate button, Diagnostics Test or Other Data Source.
-
On the [EMR Charting Template Text Elements] window, check all items that apply.
-
Click Done.
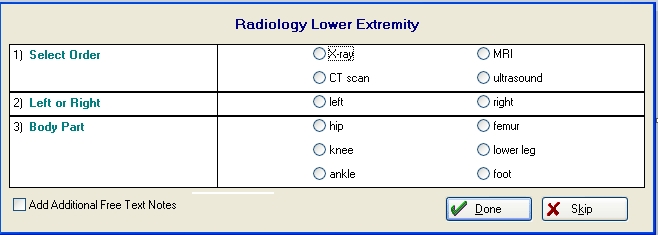
- At this point, if this is a Radiology or a Lab order (which has a checkout option action either "Radiology Order" or "Lab Order"), the provider will have an opportunity to create the order with high priority as STAT. Clicking done will present either a new dialog window for single elements:

or the priority can be set as STAT with a checkbox located within the Smart Form Charting Wizard window for multi-test panels:
Selecting the Order with STAT priority checkbox will cause the order to be created as STAT - high priority. - If one or the other option is selected, The wording "STAT" will display in the Charting Note.
- Priority STAT will also appear on the printed order.
-
Net Health Employee Health and Occupational Medicine will execute Wizards associated with selected Text Elements. Make entries as required on the [Smart Form Charting Wizard] window.
-
If this visit has multiple diagnostic codes associated with it, on that same window you can associate procedures with a single diagnostic code:
-
Click the table icon beside Problem.
-
On the [Select Associated Problem] window, highlight the correct Problem Description, and click Select.
-
When you return to the [Generate EMR Charting Note] window, Net Health Employee Health and Occupational Medicine will have updated three fields. Number of Date Sources, and Management Options Risk Level, Number of Diag Procs Risk Level are factors used by Net Health Employee Health and Occupational Medicine in determining the level of documentation entered and the level of E/M code which it can support. When you set up wizards for Diagnostic Tests and Other Data Sources, these factors can be entered for each wizard. They are tallied on this screen, based on the selections you made.
-
-
Other Orders
Therapy, Consults/Referrals, and Patient Local Measures all work like most Template Elements on other tabs.
-
Click the appropriate button.
-
On the [EMR Charting Template Text Elements] window, check all items that apply.
-
Click Done.
-
Net Health Employee Health and Occupational Medicine will insert text and execute Wizards associated with selected Text Elements. Make entries as required on the [Smart Form Charting Wizard] window.
-
A visit might have multiple diagnostic codes associated with it. If so, on Therapy and Diagnostic Test orders you can associate procedures with a single diagnostic code on that same window:
-
Click the table icon beside Problem.
-
On the [Select Associated Problem] window, highlight the correct Problem Description, and click Select.
-
-
-
Create Orders with an Order Set Rapid Chart
A Rapid Chart runs a group of associated Wizards. Order Set Rapid Charts can, as the name suggests, include any Wizards that create physician order records from the ORDERS tab, but they can also include Wizards from the INSTRUCTIONS tab. If you click the Order Set button, a list of all Order Set Rapid Charts will be displayed. You may run any set that you want, one at a time, by highlighting the Rapid Chart and clicking Select.
You can also run Rapid Charts that are associated with this specific Charting Template from the Rapid Charts tab.
Read about Wizard Setup to learn more about creating orders with Wizards. Read about Rapid Chart Setup to learn how to create Order Set Rapid Charts.
Manage Orders
View Patient Information
-
Problems List
This button displays an expanded view of the Problems Lists always displayed to the left of the window.
-
Labs history
-
Vial Signs history
Vital signs are entered on the VISITS tab. To see a history of the patient's vital signs, click the Vitals button on the ORDERS tab or on the [Enter Patient Visit] window
-
Click Review to see the vital signs for the highlighted visit.
-
Click Graph to create a graph of vital signs.
-
Check Document Review to add this text to the charting note: "Reviewed history of patient's vital signs. (Bates, Christine MD, 1/18/08 at 11:32AM)."
-
Click Done to exit.
-
-
Immunizations history
-
Past Notes history
Click Past Notes to see a list of all chart notes created for this patient. Double-click the one of interest. This is especially useful on follow-up visits to learn the details from the initial visit.
Create Patient Care Plan
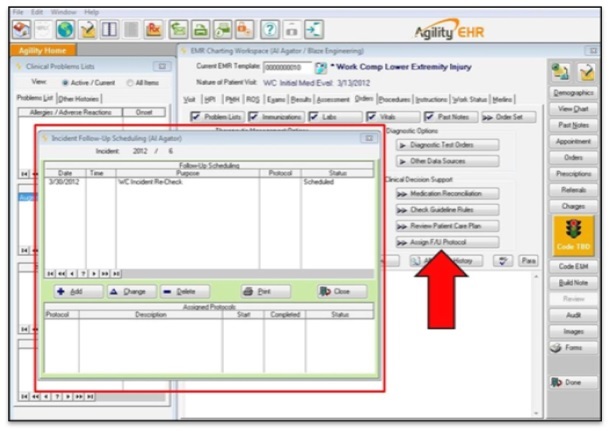
Follow-up Protocol Scheduling
EMR Charting has a button on the ORDERS tab, under the Clinical Decision Support group titled Assign Follow-up Protocol. This button is only available for visits associated with an incident and when clicked, it will take the user to the [Incident Follow-up Scheduling] window.
To preview this feature:
1. From the Patient Visit window, select EMR Charting on the right of the window.
2. The EMR Charting Workspace displays.
3. Select the Orders tab.
4. A new button, called Assign F/U Protocol will display under the Clinical Decision Support section of this tab.